Showing posts with label Fall. Show all posts

Sunday, November 6, 2011

Homemade Pectin


  Pectin gives jellies and jams structure so they don't run all over the place. I don't mind the structure and I actually prefer it, but I do mind the preservatives that many of the packaged pectins seem to have not to mention the price. This year I decided to make my own pectin. Lo and behold, I am not the only one to ever think of it. Guess what? This is how they used to do it before you could buy it in a box or a tube! Imagine that!

  You need a bunch of green, unripened apples. When I say green apples I don't mean Granny Smith apples, I mean apple that are not ripe yet regardless of what color they will turn when they are ripe. It turns out green unripened apples are very high in natural pectin. I was able to get my apples from an old tree where I work that almost nobody even realizes is there. If you don't have your own orchard or know someone that does, chances are you can find an apple tree somewhere nearby that is in need of attention. And since it is early in the season when these apple are harvested, they are still in pretty good shape before the insects get hold of them later in the summer.


  The trick is to get the pectin concentrated and in a form you can add to your jelly and jam recipes. I washed the apples good, chopped them up in my food processor and cooked them down in the biggest pot I have. Drained the liquid off and canned it for later use. The process I used is located here. I have also reproduced the text found at this link below in case the original is ever deleted.

*******************************************************************
HOMEMADE PECTIN STOCK


From Harriet Fasenfest, Co-owner, Preserve

1. Put 3-4 pounds chopped apples in a non-reactive pan. Add enough water to barely cover apples and bring to a boil. Lower temperature immediately and let simmer until soft, approximately 20-30 minutes.

2. Pour apples and liquid through a fine sieve into a second pot. Without stirring, let this liquid drain overnight.

3. Bring liquid to a boil and cook until it has reduced to half its original volume.

4. Test pectin content (see instructions below) and continue to cook if necessary.

5. Once liquid pectin reaches the desired strength, store it in the fridge or freezer.

Testing the Pectin Level

I admit to loving this part. To determine the amount of pectin in your liquid, put 1 teaspoon of the liquid on a plate and add 2 tablespoons of rubbing alcohol to the mix. Swirl the mixture around until clots start to form. It will amaze you, but it will happen: You will know the strength of the pectin by the size of the clots.

You want a fairly large viscous clot to indicate strong pectin. Weak pectin will show up as several small, scattered clumps. If that is the case, bring the liquid back to a boil and reduce further. And toss out the test batch-you don't want to return that to the pot. Once the pectin reaches the desired strength, refrigerate, freeze, or can it until you make jam. It will keep in the fridge for up to one week.

Using Homemade Pectin

As a general guide, 2/3 cup of liquid pectin is enough to set 4 cups of low-pectin prepared fruit or fruit juice. Here again, you have room for whimsy. If you use strawberries (low in pectin) alone, use the full amount of liquid pectin. If you throw in a few currants (high in pectin) with the strawberries, use less liquid pectin. If you use half currants and half strawberries, you might not need any liquid pectin at all.

In the end, willingness to learn by trial and error and to love whatever the outcome is what will win the day.

Posted by Deborah Kane on March 2, 2007 11:55 AM
Permalink
*******************************************************************
 
TTFN
B

Caramel Pecan Brownies


  In my previous post I mentioned using the caramel dip in brownies and here is that result. This isn't a soup-to-nuts (no pun) :-) recipe per se because we used a packaged brownie mix. It is sort of a "hey what can we do with stuff we already have around the house" kind of thing.

  Anyway, we took Ghirardelli Brownie Mix from our cupboard along with a handful pecans from last year's cookie marathon and some left-over caramel dip (recipe here) and made this decadent dessert.

  Make your favorite brownie batter. Pour half into your baking vessel. Drizzle the caramel dip over the batter. Add half the pecans. Pour the remaining batter evenly on top. Top with the remaining pecans. Bake according to your brownie recipe. Enjoy!

TTFN
B


Apple Caramel Dip


  We had a few apples left over from making pies and someone said something like, "I sure wish we had some caramel dip right about now." I had never made anything like this before, so I went to the internet to get an idea of how to pull this off. I found a recipe at Cooks.com that was rated 5 stars and this is the one I used. It is very easy, quick and very yummy.

Apple Caramel Dip
1/2 c butter, melted

2 c dark brown sugar
1 c light corn syrup
2 tbsp water
14 oz sweetened condensed milk (1 can)
1 tsp vanilla

Cook butter, sugar, water and condensed milk until all the sugar is dissolved over medium heat, stirring constantly. This took about 10 minutes. Remove from heat and add vanilla.

We let ours cool a bit before serving. You can store it for a long time in the fridge, several weeks at least. After making this we decided it would be good in apple pie and brownies as well. I'm sure we'll think of a few other things too. ;-)

TTFN
B

Sunday, May 29, 2011

Bread and Butter Cauliflower

 
  Somehow this recipe never made the blog last fall, but now that we are on the last jar and wish we had more it certainly deserves mentioning. We acquired a lot of cauliflower in the fall with every intention of canning all kinds of items, but we just got plain canned-out and this was the only canning item we made with cauliflower. We used Aunt Lib's bread and butter pickle recipe and it is definitely on the canning list again this year.

Bread and Butter Cauliflower (about 4 quarts)
4 qts cauliflower, cut into florets (about 2-3 med heads)
2 medium onions, sliced thin
3 c white vinegar
4-5 c sugar
1 1/4 tsp turmeric
1 tsp celery seed
2 tsp whole mustard seed

1/2 c canning salt for cauliflower/onion prep
ice for cauliflower/onion prep

  Blanch cauliflower for 5 minutes. Put the cauliflower and onion slices in a large bowl, cover with canning salt and ice. Let sit at least an hour. Rinse the cauliflower and onions well to get all the salt off. Combine vinegar, sugar, turmeric, celery seed and mustard seed into a pot. Bring to a boil. Pack warm jars with the cauliflower and onions. Split the liquid between jars. The liquid should completely cover the cauliflower. Leave 1/4 inch of head space. Adjust two-piece caps. Process 15 minutes in a boiling-water canner or 5-10 minutes in a pressure canner at 10 psi. Enjoy!

TTFN
B

Tuesday, May 24, 2011

Mild Italian Link Sausage

 
  Who doesn't like sausage? The only thing I dislike about store bought sausage is most of it contains MSG (or natural salt if you want to be evasive). An allergy to MSG prevents some of our family from partaking in MSG laden foods, so we have to take matters in to our own hands when it comes to things like sausage. Preparing this sausage is a little extra work, but very satisfying in the end. I recommend doing as much sausage making as you can while all the sausage making gear is out. It isn't hard and maybe this entry will push you over the edge to try it yourself.

Mild Italian Link Sausage
2 lbs pork butt (with fat)
2 tsp kosher salt (or sea salt)
1 1/2 tsp black pepper, ground
1/2 tsp garlic powder
1 tbsp dried parsley
1 1/2 tsp fennel seed, ground
5 ft natural casing

For Hot Sausage Add:
2 1/2 tsp paprika, ground
1/4 tsp anise seed, ground
2 tsp red pepper flakes

  Mix all seasoning ingredients together. Cut the pork into chunks. Mix the pork and seasonings together. Grind the pork mixture with your choice of meat grinding hardware.

  Our choice of sausage stuffing and grinding hardware was the sausage attachments for our KitchenAid mixer. We used the fine die on the mixer for grinding, but recommend using the course or large die. The next time we do this we will definitely use the larger die for grinding. Once the pork is ground, refrigerate the mixture for at least an hour while preparing the casings. The mixture should be cold while stuffing the sausage.

  We used natural casings obtained from a local kitchen store. The package is fairly small and could easily be ordered from the internet if you cannot find it locally. You may want to consider using collagen casings instead of the natural casings if that is more to your liking. There is a lot of information on the internet about the different kinds of sausage casings and plenty of places to order them from. Any leftover casings can easily be stored either in your pantry or refrigerator depending on the type you choose. To prepare our casings we had to soak them in warm water and rinse them thoroughly.

  When the ground pork mixture was chilled for an hour, I tied one end of a prepared casing into a knot and slid the other end on to the sausage making tip all the way up to the knotted end. I turned on the mixer and started stuffing the ground pork mixture into the hopper which feeds an auger which eventually pushes the pork in to the casing. Continue until the casing is completely full or you run out of meat.

This particular batch was grilled with sweet onions and peppers and served on a soft italian roll.
A few things we learned along the way:
- Any left over natural casings can be stored in your refrigerator, sealed in the original bag completely covered in salt for up to a year.
- To clean out the auger after making the sausage, send a few pieces of bread through the system to push out any left over meat. This greatly simplified the cleanup.

Enjoy!

TTFN
B

Friday, November 26, 2010

Vegetable Soup


  Vegetable soup is another one of those foods that is synonymous with the cooler weather of fall. Making the soup also gives us a way to use up all of last year's frozen vegetables that didn't get used up as well as any new fresh vegetables that are available. Usually around the cabbage harvest is when we make our soup, so for our location it is around mid October or so. This is definitely one of our comfort foods and it fills the house with a smell that is so nice to walk in to. This is not necessarily a definitive recipe so to speak, as with many of our recipes it is more of a guide and we use whatever we have available.

Vegetable Soup (Makes about 12 quarts)
2 quarts vegetable stock
2 28 oz cans crushed tomatoes with basil

3 quarts frozen crushed tomatoes (from last year)
2 quarts frozen sweet corn (from last year)
2 quarts frozen Lima Beans (from last year)
2 quarts frozen green peas (from this year)
1 quart frozen yellow squash (from last year)
1 medium head of cabbage, sliced medium thin
1 quart of fresh carrots, course chop
1/4 c fresh parsley, course chop
3 tbsp salt
1 tbsp pepper
2 tsp garlic powder

  We used a 15 quart pot to make the soup. I added only enough water to get the pot up between the 14 and 15 quart mark. It will cook down to about the 12 quart level. We add everything to the pot and brought it to nearly boiling and simmered it for about 8 hours. Be sure to taste it at least at the halfway point to adjust any of the seasoning components. Stir it every now and then to keep the soup from scorching. If the soup does scorch, don't scrape the stuck bits on the bottom of the pot. This will contaminate the whole pot. Just transfer it to an appropriately sized container and clean the soup pot or use another one if you have it to spare. If you are going to eat it right away or freeze it then it should be ready to go.

  If you are going to can the soup here are a few things to remember:
  • Don't add any starch components to the soup like pasta, potatoes or thickening agents. You can add these things when you heat the canned soup for consumption.
  • You can cook the soup for 2 hours less because the canning time is 1.5 hours.
  • Do this when you have enough time to can the soup after making it. We can only do 5 quarts at a time and since we canned 10 quarts total we had about 4 hours of canning time after making the soup. If time is tight, you can make the soup one night and store it in the refrigerator (after it cools) and then can it the next night. Just remember to get the soup back up to near boiling before jarring.
  We put ours in hot clean quart jars and processed them in a pressure canner for 90 minutes at 10 pounds pressure. This was the first time we canned it and we have sampled the final product and it is wonderful. We will definitely do this again!

TTFN
B

Wednesday, November 24, 2010

Poultry Seasoning


  Poultry seasoning must be worth about the same amount per pound as gold or at least my local grocery store thinks so. I must have spent $20 last year on this blend alone. After that I made up my mind I was going to grow as many of the components as I could in my garden and find the rest of the ingredients cheap at a bulk spice retailer. I was able to easily grow the sage, thyme, parsley and rosemary. The volume I made today would have cost me over $20 in bulk already mixed and about $40 in those tiny cylindrical containers at the grocery store. I calculate it cost me only $1 using the stuff I grew and the other bulk components I bought. Ka-ching! Now if I could only find a way to get those bagged bread cubes for something less than the going rate for silver I would be in business. :-)

Poultry Seasoning
1 tbsp dried sage
1 tbsp dried rosemary
1 tbsp dried thyme
1 tbsp dried marjoram
1/2 tsp celery seed
1/2 tsp dried parsley
3/4 tsp ground pepper

  Put it all in a coffee grinder and mix it for 5-10 seconds. Done! This makes about the same amount as one of those small cylindrical containers you buy at the grocery store for $5.

TTFN
B

Tuesday, November 23, 2010

Drago's Charbroiled Oysters


    If you ever get to New Orleans, I highly recommend you stop in at Drago's for some charbroiled oysters. Several months ago I was in New Orleans on business and I ate these every night I was there. Lately I have been jonesing for them again and when my aunt offered to bring a bushel of oysters back from the Carolinas, I knew exactly what to do with them.

Drago's Charbroiled Oysters (Makes 8 servings or if you are me, just 1 serving)
32 oysters on the half shell
1 c butter
2 lg cloves garlic, pressed
1/2 tsp ground black pepper
1/4 c grated Parmesan cheese
1/4 c grated Pecorino Ramano cheese
1/2 c fresh parsley, finely chopped

  Heat your grill to medium high heat. Melt butter in a sauce pan. Add garlic and pepper to butter. Mix cheeses together in a bowl. Spoon melted butter mixture into each oyster. Add a pinch of cheese mixture. Add a pinch of parsley. Grill for 8 minutes until hot and bubbly. Enjoy! :-)

TTFN
B

Friday, November 5, 2010

Last Garden Update for 2010


  Well, the last of the garden has been picked. Tomatoes, tiny bell peppers and a few herbs are all that remains. As usual we try to use up what we grow, but I won't bother to tell you how our green tomato pie turned out. We nicknamed it tobacco juice pie if that is any indicator. :-) The green tomato relish looks like it came out ok. We canned it already, but I haven't tasted it yet.

  It has been many weeks since my last post, but we haven't been idle. I have so many things to write about and hopefully I'll find the time to get it all done. There are still several canning items to post about from late August and early September and we canned some bread and butter cauliflower too. We made our own italian sausage and sourdough cinnamon rolls that are heavenly. I can't believe I have so many things in the queue that haven't made it to the blog yet. Look for more posts in the near future.

  Oh, and I just enabled comments for non-members. We'll see how that goes for a while. :-)

TTFN
B

Saturday, August 21, 2010

Baked Butternut Squash


  I discovered Butternut squash relatively late in life and since it has been in season for the last couple of weeks it seemed appropriate to do an entry on this versatile squash. It has become one of my staple sides for large family dinners and it is pretty easy to prepare while other tasks for large family dinners are being completed.

Baked Butternut Squash
1 Butternut squash
3 tbsp butter
salt
pepper

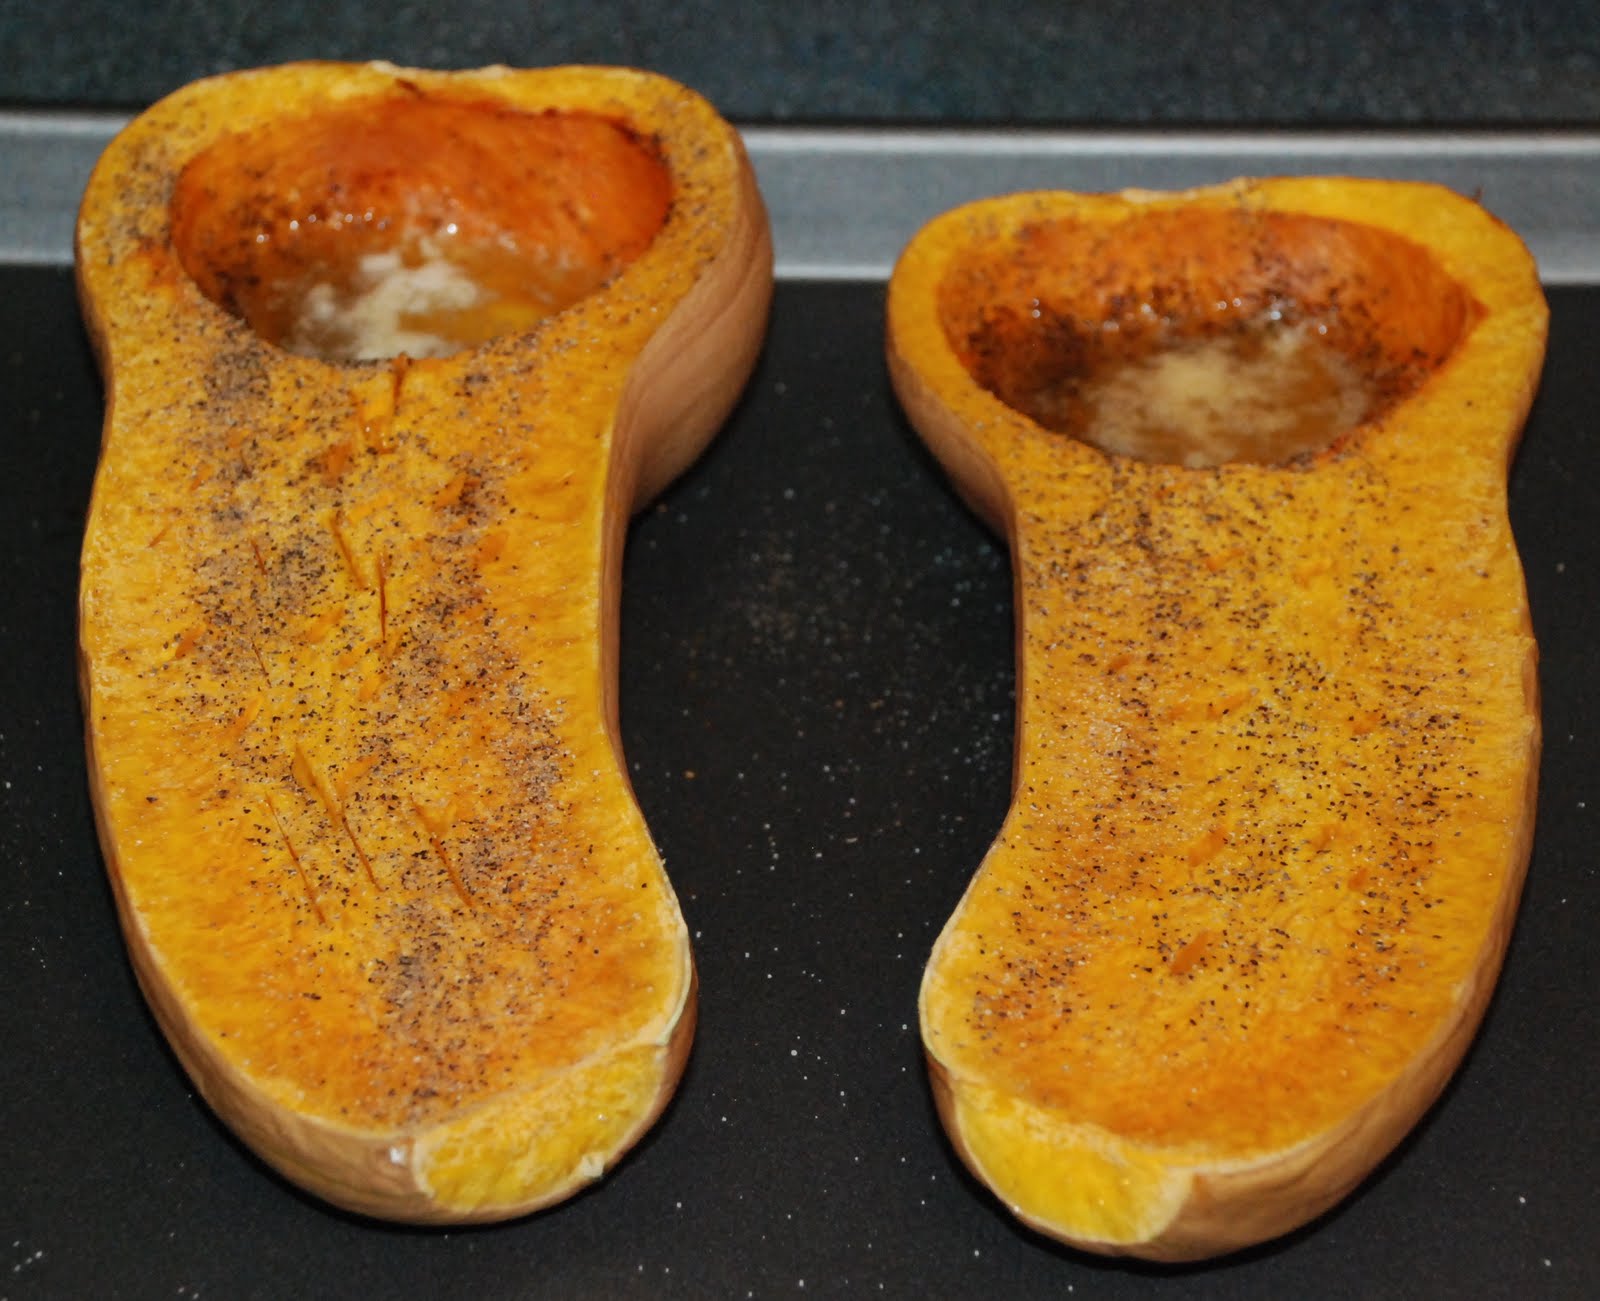
  Pre-heat your oven to 350 degrees Fahrenheit. Cut the squash in half lengthwise. Scoop out the seeds and fibrous innards until just the meat of the squash is left. Lay on a baking sheet. I slice two small flat spots on the rounded bottoms so they don't roll and spill the melted butter. Add a tbsp of butter to each squash half and sprinkle with salt and pepper. Bake for 1 hour.


  When the squash has cooled a little, scoop the baked flesh out with a spoon and place in a bowl. I add another tbls of butter, mash it up with a potato masher, and add salt and pepper to taste. I like to eat it just like that. Many people like to add cinnamon, sugar and nutmeg before putting it in the oven. I think that tastes good too. These are easy enough to acquire and prepare so a little experimentation isn't too troublesome. Enjoy! :-)

TTFN
B

Fresh Pork Breakfast Sausage


We love sausage. This endeavor was initiated due to my girlfriend's allergy to MSG. I wanted her to taste sausage again because she likes it so much and can never have it. I did my own little empirical experiment and read every sausage ingredient list in every food store I went to for about 2 months and every single sausage package had MSG or the lesser known name for MSG of natural salt listed. I did recently find Johnsonville Brats without MSG and we eat a lot of those, but they aren't breakfast sausage. So, where to start? I started with Alton Brown's recipe from the Food Network and made it my own. Here is what I came up with:

Pork Breakfast Sausage
2 lbs fresh, cheap pork (bones not included)
2 tsp kosher salt
1 1/2 tsp black pepper
4 tsp poultry seasoning
1 tbsp brown sugar
1/2 tsp grated nutmeg
1/2 tsp cayenne pepper
1/2 tsp red pepper flakes
1/2 tsp garlic powder

  I am sure there are sausage connoisseurs out there that will tell you to use only certain cuts of meat. In fact Alton Brown recommends using pork butt, but I tend toward what is available and economical. In this version we used a Pork Loin Sirloin End Roast (whatever that is). I recently saw a pork shoulder for $1.69 a pound and mammasan thought that might make good sausage, so we'll probably try that at some point. The bottom line is, use the pork you want to use! You want 2 lbs of meat after de-boning. If you do have a bone, make sure you save it for a soup or Gramma and Grampa's sauce. Just throw it in freezer bag and freeze it until you need it.
  Cube the meat and place in a large bowl. Mix all the other ingredients together and sprinkle over the meat cubes. Mix well. Chill for 1 hour. Grind according to you meat grinder's instructions. We don't have a grinder, so we used our food processor. If you use a food processor, don't fill the container more than 1/3 full at a time. I ground all the meat up and put it back in the mixing bowl and gave everything a good stir when it was done.


  We froze our extra sausage. Whenever I freeze meat I try to make sure it is flat so I can stack it and thaw it easier. We just put about 1/2 lb in a freezer bag and got as much air as possible out before sealing it. Then I press it flat and stack it in the freezer. A quick defrost cycle in the microwave first thing in the morning or an over night thaw in the fridge should have it ready for breakfast. Here is the finished product:


TTFN
B

Saturday, July 10, 2010

Refrigerator Pickled Hot Peppers


This started out as more of an experiment than anything because of the shear number of hot peppers my plants are producing. I was afraid they would go to waste if I didn't find something to do with them. I like pickled hot pepper rings, so I thought I would try to make my own. Note: This process is not suitable for storing the jars outside of a refrigerator.

Refrigerator Pickled Hot Peppers
2 medium cucumbers sliced lengthwise and halved to fit in the jars
5 pints mixed hot peppers
8 c distilled vinegar
8 c water
1 c pickling salt
16 whole cloves garlic peeled
8 tsp whole peppercorns
8 tsp dried onion
4 tsp dried dill
8 pint canning jars with lids
ice

The trick to crunchy pickles is an ice bath before jarring. The cucumbers were cut into spears and sized to fit in the pint jars. The peppers were cut into rings where appropriate and long skinny peppers were cut to fit in the pint jars longwise. We used Cowhorn, Jalepeno, Cayenne and Hungarian Wax peppers. Once the peppers and cucumbers were cut and sized, they all went in to a pot slightly bigger than the volume of the vegetables and were covered with ice. Add enough water so that icy water covers all the vegetables. Leave in the ice bath for 2 hours. Add more ice if needed.

All jars and lids should be cleaned and sanitized. Boiling water can be used to sanitize. At about the 1.5 hour mark line the jars up and in each one add 2 cloves garlic, 1 tsp peppercorns, 1 tsp dried onion and 1/2 tsp dried dill. Combine the vinegar, water and pickling salt in a sauce pot and bring it to a boil. Drain ice and water off the peppers and cucumbers and begin to pack them into the jars leaving 3/4 of an inch space at the top. Put a wide mouthed canning funnel in the first jar and ladel enough of the boiling brine into the jar to cover the vegetables but leaving 1/2 inch of space at the top. Immediatly put a lid on the jar. Follow this process for each jar. After a few hours of cooling, the lids should all have 'popped' in. Check each one to make sure they have formed a vacuum seal. After about 8 hours they should be cool enough to store in your refrigerator.

I was very pleasantly surprised by the flavor and crunchy texture of the pickled goodies. I only waited 2 days before sampling the first jar and I thought they were pretty good. I will be trying this technique on some other vegetables as well. If I had it to do over I would use bigger jars because the pint jars were a little too fiddly trying to pack enough stuff in to each one. From the information available on the internet it looks like these sealed jars should keep in the refrigerator for 6 months.

TTFN
B

Fried Green Tomatoes


  Fried green tomatoes may be food related to usage of all those green tomatoes that will go to waste if not eaten at the end of the growing season, but I have a whole bunch right now and I don't want to wait for 3 months. I have eaten them fried before, but never made them myself until now. Once again I looked at everyone elses recipes and used that information as the basis for my own.


Fried Green Tomatoes
3 large green tomatoes cut into 3/8" to 1/2" slices
2 c canola oil for frying
1 c panko crumbs
1/2 c corn meal
1 c flour
1 c milk
2 eggs beaten
salt
pepper

  Lay tomato slices out onto a cookie sheet or similar surface, salt and pepper each side and let sit for 15 minutes. Heat oil in a skillet on medium high. Setup a four station assembly line: milk first, flour, egg followed by panko and corn meal mixture. Plates work well for the dry ingredients and bowls for the wet. Take each tomato slice through the assembly line. Coat each one with milk, dredge in flour, coat with egg and finally dredge in panko and corn meal mixture. Fry in hot oil until golden brown, about 3 to 4 minutes on each side. Remove from oil and drain on paper towel. Season with salt as soon as they are removed from the oil. Serve with lemon wedges and hot sauce. They are pretty good with ketchup too. :-)

  This version came out very crunchy and will definitely be served here again.

TTFN
B

Thursday, June 24, 2010

Ratatouille with Quinoa


  Around our home anything that remotely resembles the recipe below is called Ratatouille. Maybe we're wrong, but one thing is for sure, if any combination of eggplant, peppers, tomatoes, yellow squash and zucchini is available, we cook it and call it the R-word. I'll list the ingredients for this version, but it isn't likely this exact recipe will be repeated here again. We even cook it different depending on the time of the year. In the summer we tend to use the stove top more and try to get it cooked relatively fast to avoid heating the kitchen up, but in the fall we make it in the oven and roast everything. As many ingredients as possible were used from the bucket garden.


Ratatouille with Quinoa
1 small Lavender eggplant cubed
2 small to medium zucchini cubed
3 small yellow squash cubed
3/4 medium white onion chopped
1 yellow bell pepper chopped (light green really ...)
4 plum tomatoes chopped (seeds removed)
1 14 oz can diced tomatoes
1/2 c canned mushrooms
2 cloves garlic (pressed)
1 1/2 c celery chopped (leaves and all)
6 tbsp extra virgin olive oil
1 bunch parsley chopped (reserve small amount for garnish)
1 small bunch oregano chopped
1 small bunch basil chopped
4 c cooked quinoa
grated mozzarella cheese
salt
pepper


  In a large skillet heat olive oil over medium heat. Add onions and garlic. Stir until soft and the aromatics are released. Add celery eggplant, and yellow squash. Lightly salt to help the vegetables to weep. Saute for 5 minutes. Add zucchini peppers and tomatoes. Once again, lightly salt. Saute for 5 minutes. Add additional salt and pepper to taste. Add parsley, oregano, basil and mushrooms. Stir well and simmer for 30 minutes. Stir occasionally. Serves 4. Plate over quinoa. Melt cheese on top. We use the microwave. Garnish with chopped parsley. Enjoy!

TTFN
B