Saturday, August 21, 2010

No Pectin Plum Jam


  A week or so ago I posted a couple of updates about a marathon canning session due to some free produce we acquired. Twenty four pints of plum jam are one of the fruits (pun intended) of our labor. I only made a few pints the first time around, but it came out so well we did twenty one more. Plum jam isn't something you hear about every day and quite frankly I am surprised. We are not big jam eaters here, but I can foresee several uses for this recipe beyond your typical pb&j application. Currently I am planning to use it as a base for a liqueur, barbecue sauce for pork ribs and glaze for roasted meats. We used the Damson Plum recipe out of the Ball Blue Book and as it turns out I believe these are actually Damson Plums, though I didn't know it at the time.

No Pectin Plum Jam (yields three pints)
5 c coarsely chopped plums
3 c sugar
1/2 c water

  We used our food processor to chop the plums. Combine plums, sugar, and water in a large saucepan. Bring to a boil slowly, stirring until the sugar is dissolved.. Cook rapidly to the gelling point. This takes about 30 to 40 minutes. Stir frequently to prevent scorching. Remove from heat and skim any foam. Ladle into hot jars, leaving 1/4 inch head space. Adjust two-piece caps. Process 15 minutes in a boiling-water canner.
  We changed two things. We used less water than the original recipe calls for because the cooking time is a little long and I processed my jars in a pressure canner for 10 minutes. By 'no pectin' I really mean no pectin added. Plums are naturally high in pectin and if you are patient, you don't need to add any. I prefer not to add anything besides simple ingredients to any of my food if not absolutely necessary.
  I haven't done anything with the jam yet, but you can bet it will show up in at least one recipe here at some point. Enjoy,

TTFN
B

Baked Butternut Squash


  I discovered Butternut squash relatively late in life and since it has been in season for the last couple of weeks it seemed appropriate to do an entry on this versatile squash. It has become one of my staple sides for large family dinners and it is pretty easy to prepare while other tasks for large family dinners are being completed.

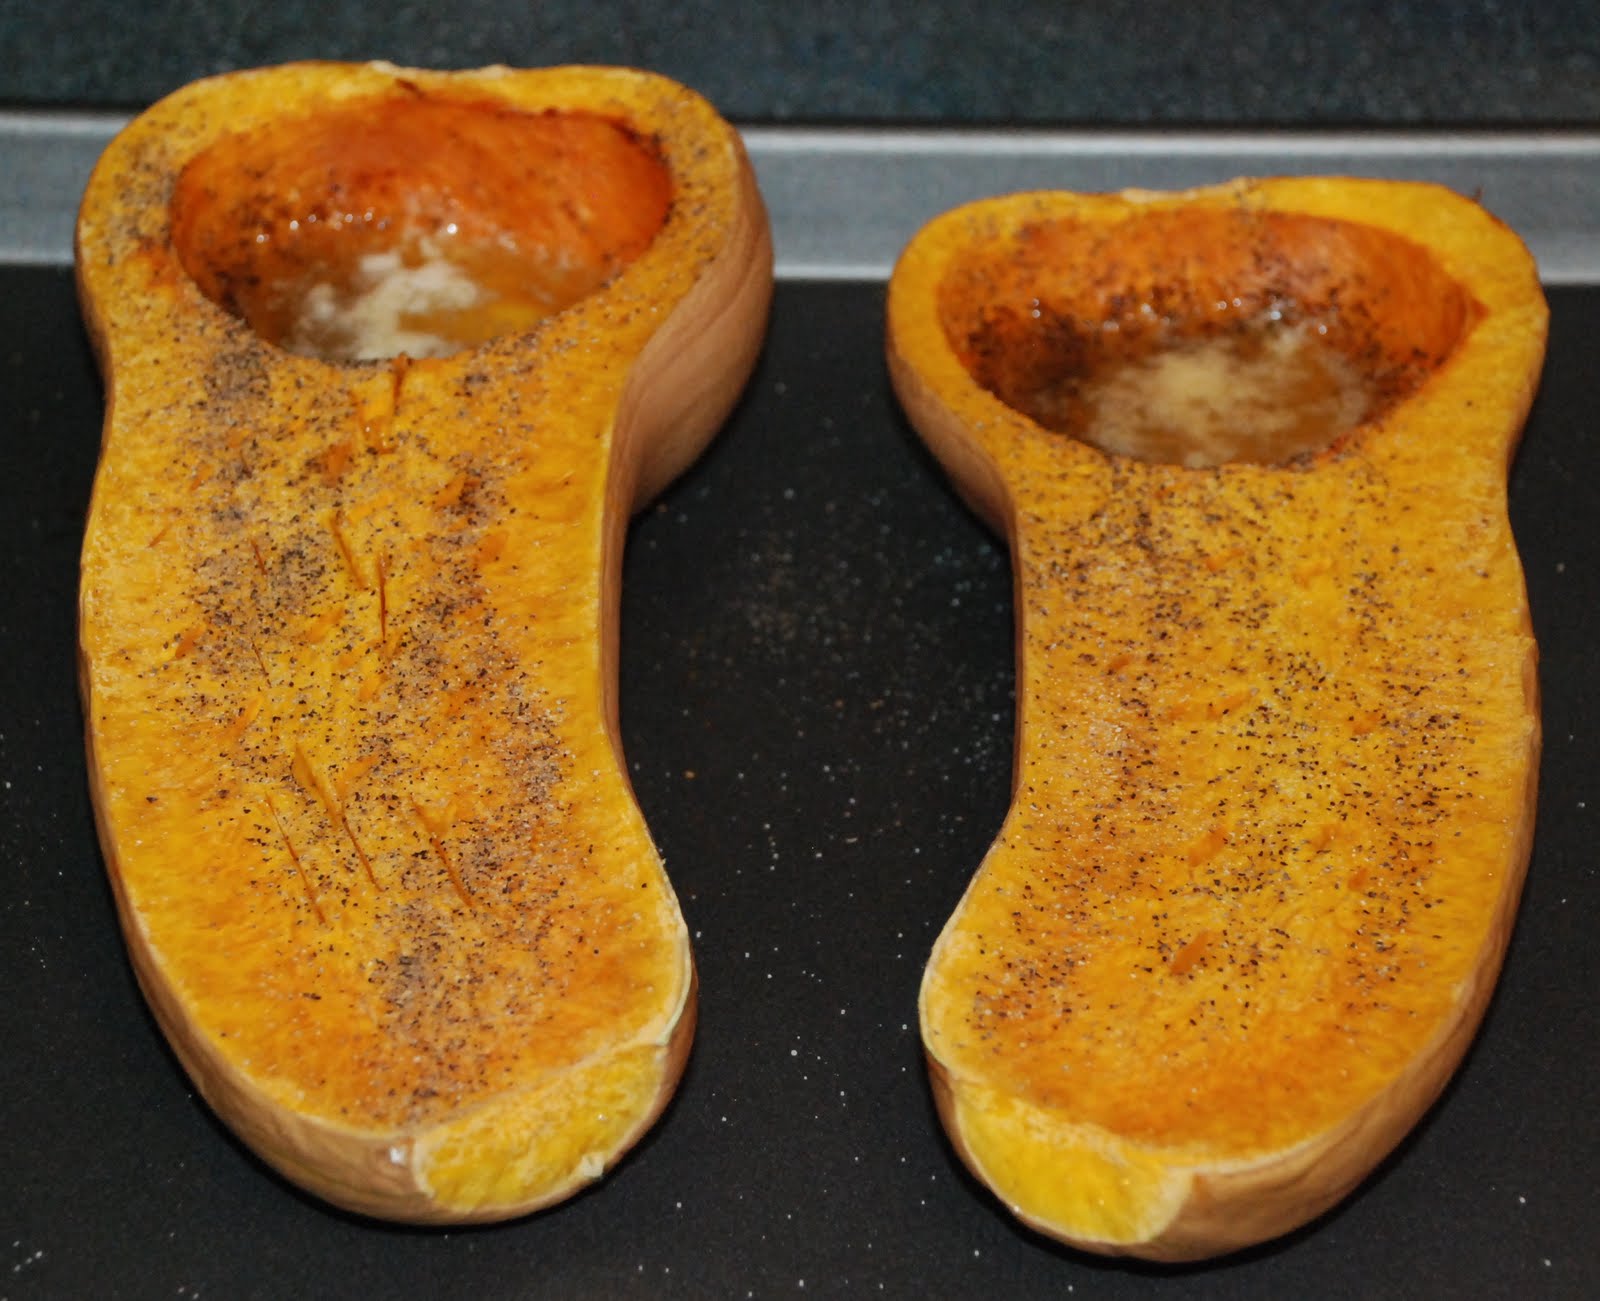
Baked Butternut Squash
1 Butternut squash
3 tbsp butter
salt
pepper

  Pre-heat your oven to 350 degrees Fahrenheit. Cut the squash in half lengthwise. Scoop out the seeds and fibrous innards until just the meat of the squash is left. Lay on a baking sheet. I slice two small flat spots on the rounded bottoms so they don't roll and spill the melted butter. Add a tbsp of butter to each squash half and sprinkle with salt and pepper. Bake for 1 hour.


  When the squash has cooled a little, scoop the baked flesh out with a spoon and place in a bowl. I add another tbls of butter, mash it up with a potato masher, and add salt and pepper to taste. I like to eat it just like that. Many people like to add cinnamon, sugar and nutmeg before putting it in the oven. I think that tastes good too. These are easy enough to acquire and prepare so a little experimentation isn't too troublesome. Enjoy! :-)

TTFN
B

Fresh Pork Breakfast Sausage


We love sausage. This endeavor was initiated due to my girlfriend's allergy to MSG. I wanted her to taste sausage again because she likes it so much and can never have it. I did my own little empirical experiment and read every sausage ingredient list in every food store I went to for about 2 months and every single sausage package had MSG or the lesser known name for MSG of natural salt listed. I did recently find Johnsonville Brats without MSG and we eat a lot of those, but they aren't breakfast sausage. So, where to start? I started with Alton Brown's recipe from the Food Network and made it my own. Here is what I came up with:

Pork Breakfast Sausage
2 lbs fresh, cheap pork (bones not included)
2 tsp kosher salt
1 1/2 tsp black pepper
4 tsp poultry seasoning
1 tbsp brown sugar
1/2 tsp grated nutmeg
1/2 tsp cayenne pepper
1/2 tsp red pepper flakes
1/2 tsp garlic powder

  I am sure there are sausage connoisseurs out there that will tell you to use only certain cuts of meat. In fact Alton Brown recommends using pork butt, but I tend toward what is available and economical. In this version we used a Pork Loin Sirloin End Roast (whatever that is). I recently saw a pork shoulder for $1.69 a pound and mammasan thought that might make good sausage, so we'll probably try that at some point. The bottom line is, use the pork you want to use! You want 2 lbs of meat after de-boning. If you do have a bone, make sure you save it for a soup or Gramma and Grampa's sauce. Just throw it in freezer bag and freeze it until you need it.
  Cube the meat and place in a large bowl. Mix all the other ingredients together and sprinkle over the meat cubes. Mix well. Chill for 1 hour. Grind according to you meat grinder's instructions. We don't have a grinder, so we used our food processor. If you use a food processor, don't fill the container more than 1/3 full at a time. I ground all the meat up and put it back in the mixing bowl and gave everything a good stir when it was done.


  We froze our extra sausage. Whenever I freeze meat I try to make sure it is flat so I can stack it and thaw it easier. We just put about 1/2 lb in a freezer bag and got as much air as possible out before sealing it. Then I press it flat and stack it in the freezer. A quick defrost cycle in the microwave first thing in the morning or an over night thaw in the fridge should have it ready for breakfast. Here is the finished product:


TTFN
B

Thursday, August 19, 2010

Aunt Lib's Bread and Butter Pickles


  The continuing saga of the canning marathon. We canned twenty three quarts of bread and butter pickles. We used the Ball Blue Book recipe for the majority of our bread and butter pickles, but we have found a recipe we like better since then. This is the recipe we recommend:

Aunt Lib's Bread and Butter Pickles (about 4 quarts)
4 qts cucumbers, unpeeled
4 medium onions, sliced thin
3 c white vinegar
4-5 c sugar
1 1/4 tsp turmeric
1 tsp celery seed
2 tsp whole mustard seed

1/2 c canning salt for cucumber prep
ice for cucumber prep

   Combine cucumber and onion slices in a large bowl, layering with salt; cover with ice. Make sure the salt is mixed well throughout. Let sit for 3 hours. Rinse the cucumbers and onions well to get all the salt off. Combine vinegar, sugar, turmeric, celery seed and mustard seed into a pot. Bring to a boil. Add rinsed and drained cucumbers and onions. Continue cooking just until the cucumbers change color. Only a few minutes. Pack warm jars with the cucumbers and onions. Split the liquid between jars. The liquid should completely cover the cucumbers. Leave 1/4 inch of head space. Adjust two-piece caps. Process 15 minutes in a boiling-water canner. Enjoy!

TTFN
B

Fire Roasted Red Peppers


Roasted red peppers are another handy preparation to have around. We harvested these from the bucket garden and Mommasan had the great idea of roasting them, so on the grill they went. We hadn't done this before, so we have some wisdom to pass on. Cutting in half and coring was the only prep work we did. Getting the roasting part right is the tricky part. You want the peppers to lay as flat as possible with the skin side toward the heating surface. You can do these under your oven's broiler as well. The trick is getting every part of the skin blistered. If it isn't blistered everywhere then it will be tough to get all the skin off. The skin comes off very easily if it is blistered properly. If you are having a tough time getting the skins off put'em back on the grill. We had more than we could immediately use so I canned the remainder into half-pint jars for later.

TTFN
B

Fire Roasted Eggplant With Garlic


  This is a pretty versatile preparation. I was driven to try this because we had some eggplant lying around getting soft and roasting it on the grill sounded like a great idea. You can see I cut couple of slits in each half lengthwise and stuffed whole cloves of garlic in there to roast along with the eggplant. The picture above is the eggplant right off the grill. The following pics are prior to and during grilling:


  To prepare the eggplant for grilling, I simply sliced it in half, made four or five slits for the garlic cloves, drizzled a little olive oil on top and finished with a little sea salt and cracked black pepper. Each side was grilled for about 5 minutes and then I shut half the grill off and placed the eggplant on the 'cold' side and closed the lid for about 20 minutes. All the grilling was done on the lowest flame.
  After roasting, the eggplant can be scooped out and placed in a bowl. It is now ready for several wonderful dishes including a rustic mixture of feta, roasted tomatoes and herbs served over rice, quinoa or couscous as well as roasted eggplant pesto. These particular beauties ended up mashed together with roasted red peppers and olive oil and served on thin slices of toasted sourdough bread. Use your imagination. I am sure there must be at least a dozen excellent ways to use roasted eggplant. Enjoy! :-)

TTFN
B

Saturday, August 14, 2010

Sourdough Bread


  I have embarked upon another journey, only, this one has me a little more excited than pasta and canning. I feel like Tom Hanks' character on the beach in Cast Away when he has his arms extended to the heavens shouting, "I HAVE MADE FIRE." Only, I would shout, "I HAVE MADE BREAD." Bread you say? Anyone can make bread .... Well, as it turns out this last statement is true, but there is a little twist ... you are only allowed to use three ingredients; flour, water and salt. No store bought yeast, no oil or butter, no fancy dough conditioners or vital gluten, no store bought pre-mixed dough in a bag ... just flour, water and salt. What do you say now ...?
  If you are not already familiar with this process then you will be amazed at how easy it is to do, how nice it looks out of the oven and how supremely awesome it tastes. This was made with only three ingredients, some time to prepare and read about the process and some common kitchen items. I am not going to describe the step by step detailed process to you or shoot a video because many people before me have already done this and they are much better at it than I am. I will give you a road map though and provide you with my lessons learned. I started this journey about a week and a half ago and had some failures in the beginning, but now I know what to do and maybe I can save you a little time if you care to try this. First of all this is what my first success looked like out of the oven this morning:


I think it looks pretty sexy. :-)  Anyone can do this. It might even be fun to do with kids because it is that easy. First, learn about sourdough starters and how to make them by visiting this link. Sourdough Baking by John Ross will explain most of what you need to know about making a sourdough starter and he will even give you a recipe for making the bread, but I suggest you read on and follow a different bread recipe which will unfold as we go. Don't add commercial yeast either. If you follow John's direction (minus the commercial yeast) it will work. I will mention a few things here while we are on the subject of sourdough starters. If you have city water, don't use the water straight out of the tap for the dough or the starter. It may kill your local wild yeasts that have setup camp in your sourdough starter container. This was the cause of all of my failures. As soon as I stopped using my city water out of the tap, things started coming together. Hopefully I can help someone avoid this frustration because it almost stopped me from continuing. Feel free to use well water from the tap or city water from a Brita filter or I read you can leave a container of city water out on your counter for 8 to 10 hours and the chlorine will go away.

Next, watch the video below. It will explain a technique that somehow attracted a cult following. Very similar techniques are used in other place around the world, but somehow in all our wisdom and gadgetry we lost this process and Mark Bittman and Jim Leahy are here to remind us.


Ok, the important parts to take away from the first video is the container Jim Leahy used to bake the bread and how simple his technique is. The next video will tie this technique together with sourdough baking and provide an easy to use and remember recipe for the bread. I want to warn you, the video is a little freaky, but it has all the info you need to get where we are going.


That's it! It couldn't be any easier. Here is the bread recipe if you missed it:

No Knead Sourdough Bread (1,2,3 method or 1,1,2,3 method for you detailists)
1 c sourdough starter
1 c warm water
2 tsp salt
3 c flour

There may be some differences due to oven type, choice of baking vessel or sourdough starter characteristics, but this is the general process which can be tweaked for your set of variables. Mix the ingredients together in a bowl. This step shouldn't take more than a minute. Cover the bowl with plastic wrap or equivalent covering. Let the dough rise for 6 to 12 hours. Many factors contribute to this time. Ambient temperature, water temperature, sourdough starter yeast population .. etc. When the dough has doubled, put your baking vessel in the oven and turn the oven temperature to 500 degrees Fahrenheit. When the oven is at the set temperature, carefully (so you don't deflate it) dump the dough on to a floured surface. Fold all four sides toward the center of the dough. Sprinkle corn meal in your baking vessel or all over the outside of your dough. Put the dough in the baking vessel and cover for 25 minutes. Remove the lid from the baking vessel and bake for 10 minutes more.

A few things I noticed ...
I used a $10 Granite Ware Roaster to make the loaf this morning. I also purchased an unglazed clay vessel from Romertopf for the same purpose. I noticed they definitely have different baking characteristics and I am guessing it has to do with the thickness of the vessel material. My loaves darken much quicker on the thinner Granite Ware roaster than with the Romertopf. I am guessing the you could also use the glazed ceramic insert from a CrockPot. For the crock lid just used some tin foil because most CrockPot lids have some sort of plastic handle that won't survive the high oven temperatures. It is important that the vessel have a lid, preferably the vessel should be bigger than your loaf so you can get it out and use some sort of edible grit on the bottom of the vessel to keep the dough from sticking. You can use corn meal, multi-grain cereal like Uncle Bob's, wheat bran or anything like those things already mentioned. Also, the instructions for the sourdough starter tell you to throw half of it away when you feed it. It also instructs to add 1/2 c water and 1/2 c of flour. You don't have to throw it out. You can use it to make all kinds of things like pancakes or biscuits. If you know you are making several loaves then add more than 1/2 c of water and flour. Just make sure there is enough starter left to continue the colony.

My intent here was not to re-invent sourdough bread. People have been making this bread for thousands of years. It doesn't need to be re-invented, but somehow it seems out of reach for most people which seems completely wrong. Maybe it just needs to be re-introduced. Something that was a common everyday process has been replaced with a loaf of Wonder bread form the grocery store. I feel sorrow for those people who will never experience what I felt and tasted this morning. Experiment with it. Try making rye, whole wheat, multi-grain, pumpernickle, ciabatta, english muffins, buscuits, sweet breads ...... the list is endless, but use the process explained above to do it. 

If you give this a try, you won't be sorry and maybe we'll get a chance to break bread together sometime. :-)

TTFN
B