Showing posts with label Sauce. Show all posts

Sunday, June 12, 2011

Strawberry Swirl Cream Cheese Pound Cake


  We are always on the lookout for food related ideas and recipes. A few weeks ago we found this recipe in Southern Living magazine. Strawberry season had just started and this recipe was the perfect excuse to use some of the local berries that we were starting to see at all the Amish stands

Strawberry Swirl Cream Cheese Pound Cake
1 1/2 c butter, softened
3 c sugar
1 (8-oz.) package cream cheese, softened
6 large eggs
3 c all-purpose flour
1 tsp almond extract
1/2 tsp vanilla extract
2/3 c strawberry glaze
1 (6-inch) wooden skewer

Strawberry Glaze
1 c ripe strawberries, finely chopped
1/2 c sugar
4 1/2 tsp corn starch
1/4 c cool water
1 tbsp butter
2 tsp lemon juice

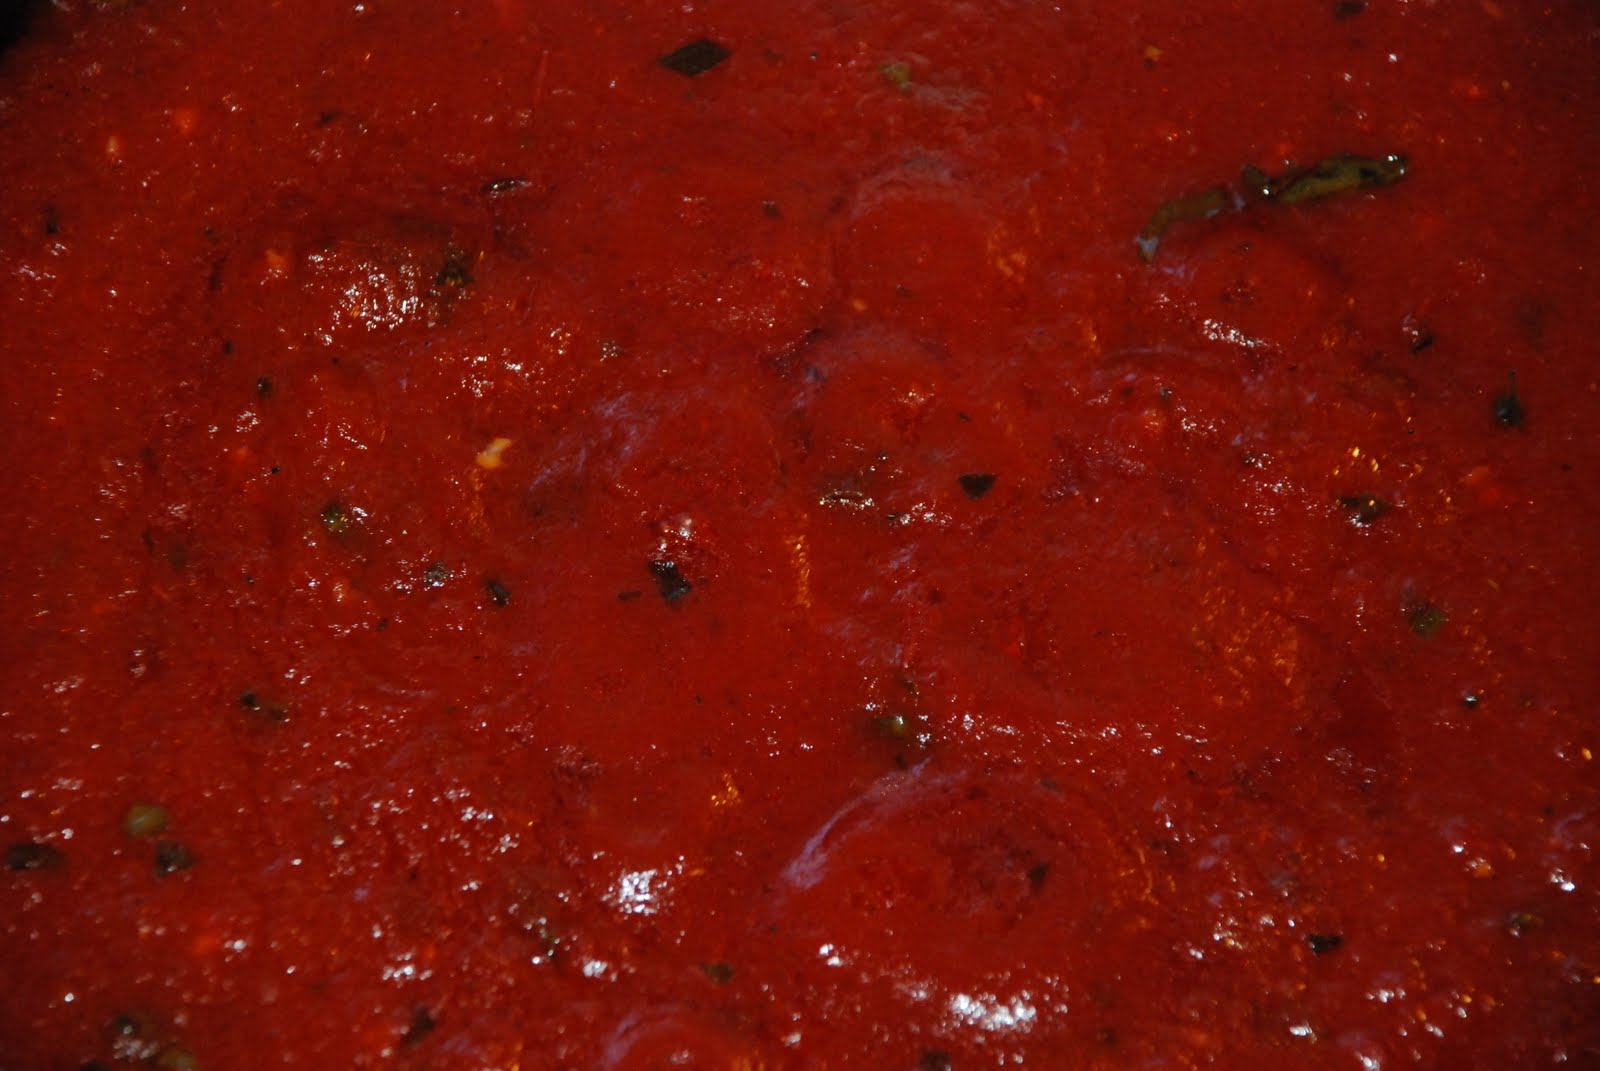
Prepare glaze. We chopped our berries very fine in a food processor. Dissolve corn starch in water. Combine chopped strawberries, sugar and corn starch mixture in a medium sauce pan. Cook over medium heat until the mixture boils and thickens somewhat. Remove from heat and stir in lemon juice and butter. Cool in fridge for 15-20 minutes. While the glaze is cooling, move on to the cake batter.

Preheat oven to 350°. Beat butter at medium speed with a heavy-duty electric stand mixer until creamy. Gradually add sugar, beating at medium speed until light and fluffy. Add cream cheese, beating until creamy. Add eggs, 1 at a time, beating just until blended after each addition.

Gradually add flour to butter mixture. Beat at low speed just until blended after each addition, stopping to scrape bowl as needed. Stir in almond and vanilla extracts. Pour one-third of batter into a greased and floured 10-inch (14-cup) tube pan (about 2 2/3 cups batter). Dollop 8 rounded teaspoonfuls strawberry glaze over batter, and swirl with wooden skewer. Repeat procedure once, and top with remaining third of batter.

Bake at 350° for 1 hour to 1 hour and 10 minutes or until a long wooden pick inserted in center comes out clean. Cool in pan on a wire rack 10 to 15 minutes; remove from pan to wire rack, and cool completely (about 1 hour).

We enjoyed the cake and of course we made some extra glaze to serve on top with whipped cream. Enjoy!

TTFN
B

Sunday, May 8, 2011

Classic NY Style Pizzeria Pizza Sauce


  If you ask ten people what the best pizza sauce recipe is you'll get ten different answers. With that said, I couldn't really tell you what even I think the best pizza sauce is because there are so many variables and kinds of pizza to consider. Pizza can be as complicated or as simple as an individual wants to make it. We like simple and the following recipe definitely fits the bill. This recipe is based on the sauce we used at the pizzeria I worked at in State College PA when I was a student. This particular pizzeria was very popular at the time and people lined up down the street and around the corner in snow and rain on Friday and Saturday nights to get $1 slices and 25 cent refills. I think this sauce is fairly representative of all the NY Style pizzeria's I have frequented over the years and I like it enough to use it in my own home.

  The sauce is very thin by design and only enough to just cover the surface of the dough is needed. It shouldn't be running off the sides or pooling in the middle of the pie. In a properly heated pizza oven (575 to 800 degrees F), the sauce looses much of the excess moisture and the flavor concentrates somewhat. My home oven only heats to 550 degrees F and this sauce even works well at that temperature. Enjoy!

Classic NY Style Pizzeria Pizza Sauce
6 oz can tomato paste
2 1/2 cans of water
1 tsp dried oregano
1 tsp dried parsley
1 tbsp salt
1 tsp pepper
1 tsp garlic powder
1 tsp sugar

  Combine everything in a bowl and mix well. You can use it right away, but it has better flavor and body if you make it at least a day before you need it. It will keep at least a week in the fridge. This is also another great excuse to use fresh parsley and oregano from the garden. ;-)

TTFN
B

Sunday, November 7, 2010

Grilled Sourdough and Eggplant Sandwich


  I saw a great recipe on another blog that I like to read and it inspired me to make this sandwich. I wanted to put a link on this entry to that recipe, but after searching through the contents I couldn't find it. However, the blog has a lot of good stuff on it and here is a link to it, http://www.eatdrink onewoman.com/.
  This was a natural evolution for me. I really like all the components to this sandwich, so it was inevitable. I prepared it the same way I would a grilled cheese sandwich. Butter two slices of sourdough bread. Put them butter side down in a pan on medium heat, pile a little shredded mozzarell cheese on each slice, put a slice of grilled eggplant on each slice of bread and put a little red sauce on one side. When the cheese has melted a little, invert one slice on to the other and brown each side until done. Enjoy!

TTFN
B

Country Ribs with Plum BBQ Sauce


  I knew this was coming when I posted the plum jam recipe and it worked out well. I had a general recipe in mind. So, after confirming a few of the proportions on the internet this is what I came up with:

Plum BBQ Sauce (about 1 1/2 cups)
1 c plum jam, recipe
1 clove garlic, pressed
1/4 c vinegar
1 tsp salt
1 tsp ground pepper
1 tsp ground ginger
1 tsp hot pepper flakes
1/4 c brown sugar
1 tbsp cornstarch
3 tbsp cool water

  Place the plum jam in a sauce pan. Combine water and corn starch, mix until smooth. Add cornstarch mixture to the plum jam and mix well. Add the remaining ingredients to the sauce pan. Mix well. Bring to a boil and immediately lower the heat to medium. Stir often. Continue simmering until the sauce is thick enough to cling to your meat, about 5-10 minutes. We applied the sauce 3 or 4 times during the grilling process and reserved a small amount for plating. I probably don't have to mention this would work well on chicken too. Enjoy!

TTFN
B

Wednesday, August 11, 2010

Gramma & Grampa's Pasta Sauce


This is a family recipe that I'll wager only family members will appreciate. It isn't a 15 generation Italian recipe that came to America on a boat. Nope, it was invented right here in the states by my Mother's parents and it was born out of the necessity to feed 6 children with what little money they had. I use the term recipe loosely because they didn't really follow a recipe when they made it. They just used whatever they could get their hands on and they put it all together in the same pot and cooked it for a long time. When it was ready it always had the same distinctive taste that still takes me back 35 years today. My mother, being the oldest, remembered many of the ingredients that were gathered to make the sauce, so it wasn't too difficult to recreate. Below is our rendition of this family recipe.

Gramma & Grampa's Pasta Sauce
10-12 quarts tomatoes, skinned and cored
1 large onion, chopped
24 oz tomato paste
2 lbs chicken hearts
2 lbs chicken gizzards
1 large pork bone or boney pork chop
1 chicken back or chicken thigh with the skin
10 cloves garlic, pressed
1/4 c salt
2 tbsp pepper
1/4 c sugar
1/2 c fresh oregano, chopped
1/4 c fresh parsley, chopped
1/2 c fresh basil, chopped
2 sprigs of rosemary
4 bay leaves
1/2 tbsp sage or poultry seasoning
3 tbsp extra virgin olive oil

Heat the oil in a 15 quart sauce pot. Add onions and pressed garlic to the pot to render the aromatics into the oil. This process should only take a few minutes. Do not scorch the garlic or onions. Add tomatoes. If using fresh tomatoes, crush them with your hands in the pot after they have been skinned and cored. We actually added 2 28oz cans of crushed tomatoes to the pot because we didn't have quite enough tomatoes from the garden. Fresh tomatoes are not a must and we used them because that is what we had. Add salt, pepper, sugar and herbs to the pot and bring to a boil. Stir often to avoid scorching. Lower heat and add all the meat and bones. Make sure you count the boney things that are added so you can fish them out later. Simmer uncovered for at least 8 hours and if using fresh tomatoes, at least 12 hours is needed. Stir at least every hour. The sauce will transform from a bright red runny mixture to a full bodied dark red sauce. When the sauce is done fish out the bones, bay leaves and rosemary sprigs(if you can find them).

If dried herbs are substituted, only use 1/3 the amount listed above. Most of the moisture has been removed from the dried herbs, so volumetrically they are not compatible. I would encourage everyone to use fresh herbs as often as possible, but I understand that isn't always easy.

As you can see from the picture, we decided to can this batch. The freezer tends to get crowded and with the new canner this became an option. We ended up with 10 quarts of sauce from a beginning volume of about 14 quarts. We'll see how it holds up. Enjoy! ;-)

TTFN
B

Tuesday, August 10, 2010

Mild Green Chile Sauce


The pepper plants are still cranking. As a matter of fact, there are probably enough peppers ready to pick for another batch by now. Green chile sauce comes in handy for all sorts of things, so a few jars will definitely get used over the next 8 months or so. I never made this before, so I got on the internet and read how others do it and this is what I came up with:

Mild Green Chile Sauce
25 Jalepeno peppers
10 green Cowhorn peppers
15 green Cayenne peppers
10 Hungarian Wax peppers
13 dried chinese hot peppers, divided
10 cloves garlic
2 tbsp salt
1 tsp black pepper
1 large red tomato
2 small red bell peppers
1 yellow bell pepper
1 tbsp olive oil
4 c distilled vinegar

De-stem all the peppers. Also de-seed the bell peppers. Process all ingredients except olive oil, vinegar and 8 dried chinese peppers in a food processor. Heat oil in a 4 quart or larger pot and add processed ingredients and vinegar. Bring to a boil and then lower heat and simmer for several hours. I started with about 6 pints of material and ended up with  4 pints. I added 2 dried chinese hot peppers to each pint and canned the result according to the Ball Blue book.

This recipe was driven by the produce gathered from my bucket garden. Any mixture of ingredients similar to this will result in a similar product. Use what you have. The resulting product was fairly mild, so I added 2 dried chinese hot peppers to each pint before canning, to add a little heat. Enjoy! :-)

TTFN
B

Saturday, July 10, 2010

Vegetable Lasagna


  The continuing saga of trying to find ways to use up all the zuchini and squash the summer months provide. We used Mom's regular pasta lasagna recipe and swapped a few things out, most notable was the zuchini and squash for the pasta. We also use ground turkey instead of hamburger or sausage because that was what we had in the freezer.

Vegetable Lasagna
7-8 c good tomato sauce (recipe)
6 c mozzarella cheese shredded
2 lbs ricotta cheese
2 eggs
2 lbs ground turkey browned and seasoned
3 medium zuchini's
4 medium squash
3/4 c fresh parsley chopped
1 tsp salt
1/2 tsp pepper

Preheat oven to 375 degrees farenheit. Slice zuchini and squash lengthwise in 1/4" thick pieces. Combine ricotta cheese, eggs, salt, pepper, parsley in a bowl. Mix well.


In a deep pyrex or stoneware baking dish layer the ingredients. We used a 13x9 stoneware baking dish. Put a layer of sauce (about a fourth), slices of zuchini and squash, meat (about a third), ricotta cheese mixture (about a third), mozarella (about a fourth). We got three layers in this pan. Finish with a layer of sauce and top with remaining mozzarella cheese. Bake covered with foil for 30 minutes then lower the temperature to 350 degrees farenheit and bake uncovered for 30 more minutes. Enjoy!

TTFN
B


Quick Tomato Sauce


My mother whipped this together one night and it was so good we will definitely make it again and put it on anything in need of a good tomato sauce.

Tomato Sauce
2 28 oz cans crushed tomatoes with basil
5 cloves garlic pressed
1 bay leaf
1 fresh rosemary branch
1/4 c chopped fresh basil
1/8 c chopped fresh oregano
4 tbsp extra virgin olive oil
2 tsp sugar
salt to taste
pepper to taste

Saute garlic in a sauce pan on medium heat for about 2 minutes. Add remaining ingredients and cook on medium high heat until it starts to bubble then back off to medium low heat for about 30 minutes more. Remove the rosemary and bay leaf. Makes about 8 cups. Enjoy!

I was surprised at the depth of flavor and substance this sauce had after such a short time. Definitely a keeper.

TTFN
B

Tuesday, June 15, 2010

Basil Cilantro Pesto

  With plenty of basil and cilantro coming out of the garden, some experimentation was in order. After a little research I came up with the following recipe:


Basil Cilantro Pesto
2/3 c packed basil leaves (washed)
2/3 c packed cilantro stalk and leaves (washed)
1/3 c grated Parmesan cheese
1 tbsp roasted sunflower seeds (instead of pine nuts)
1/2 tsp salt
1/4 tsp pepper
1 clove garlic
1/2 c extra virgin olive oil

Blend the first 7 ingredients in a food processor (about a minute). With the food processor running, slowly drizzle the olive oil into the mixture (about a minute).

I was really happy with this recipe and will definitely make it again. There are plenty of uses for pesto including pasta sauce, pizza sauce and crusty bread topper to name a few.

TTFN

B.

Sunday, May 23, 2010

Pizza Night


One of the many skills I acquired in college was pizza making. I worked at a pizza shop for a short time and learned all I could about making the dough, sauce and pizza itself. This skill has served me well over the years and I have hosted many pizza parties and have gotten several compliments as well. I haven't made pizza in quite a while because of time constraints, but I noticed my local grocery store carries pre-made pizza dough balls in the refrigerated section and they are pretty good. Good enough to forgo the trouble of making my own pizza dough and easy enough to make pizza more often.

There are certain techniques and equipment you need to make real pizzeria style pizza at home. As far as equipment is concerned you will need a baking stone, a wooden pizza peel and an oven that can bake at 550F or higher. The restaurant I worked at kept their oven at 575F to 600F. I will discuss the techniques below as needed.

Pizza Sauce
6 oz can tomato paste
2 1/2 cans of water
1 tsp dried oregano
1 tsp dried parsley
1 tbsp salt
1 tsp pepper
1 tsp garlic powder
1 tsp sugar

Mix it all very well and put it in the fridge for a day before using it.

Cheese Pizza
pizza sauce (recipe above)
pizza dough (store bought or homemade)
corn meal (for the peel)
flour (for preparation)
mozzarella cheese

  Before making any pizza, put your pizza stone in the oven with only one rack located in the center at 550 degrees Farenheit. If your oven will go higher use any higher value up to 600 degrees farenheit. I usually do this first and then start preparing everything to actually make the pizza. Don't start making the pizza until your oven has reached the temperature you want to cook the pizza at because the stone needs to heat with the oven. This may take 30 minutes.
Spread corn meal on your peel.

  Stretch the dough to the size of your peel. This technique will take some time to master. Hopefully the pictures will help explain the process.

Start by flouring your working surface and both sides of the dough.

Press your fingers into the dough about one inch in from the edge all the way around.

With thumbs together, place the fingers of both hands into the indentation in the dough.

Spread your hands apart, turn the dough about 90 degrees ...

... repeat the process ...

... several times ...

... until the dough is spread out enough to drape over both fists.

Continue the same circular spreading motion with your fists ...

... as you did with your fingers above ...

... until the diameter of the dough is the size of your peel.


Lay the dough on the peel.

Spread your sauce on the dough. Do not press hard or your dough may stick to the peel.

Spread your cheese.

Place the peel near the back of the pizza stone and with tiny jerking motions slide the peel out from under the pizza leaving it centered as best you can on the stone. If the dough sticks to the peel at this stage you will have a gigantic mess ... take my word for it and don't let your dough stick to the wood! the corn meal should act like tiny ball bearings and the pizza should roll right off of the peel. The pizza will take about 6 minutes at 550 and 5 minutes at 600. At the 3 minute mark you can spin the pizza 180 degrees if your oven does not cook evenly.


Finished product.

White Pizza With Asparagus
alfredo sauce (Recipe)
pizza dough (store bought or homemade)
corn meal (for the peel)
handful of asparagus
flour (for preparation)
mozzarella cheese

I use a microwave as often as I can to cut down on prep time. Steaming vegetables is definitely one of those time saving activities.
I put my asparagus on a plate with a little water, cover with plastic wrap and microwave for 2 minutes. Dry the asparagus off and cut into thirds.

Follow the dough process from above.

Spread your sauce.

Spread your cheese and toppings

Slide the pizza off the peel.

Finished product.

If you decide to try pizza making, I would love to hear back from you.

TTFN

B.

Asparagus Ravioli with Alfredo Sauce

  Wow, it has been many more months than I intended to write my first real entry. I actually have a few other entries started, but time seemed to slip away and now here I am  five months later. I guess the thing pushing me over the edge now is the number of people I have promised to give this recipe to and haven't gotten to that either. I suppose if I am going to write it down it might as well be here.
  We were exposed to this dish in Strasbourg France last Christmas and I immediately added it to my "gotta re-create this dish" list since my girlfriend liked it so much. I have never seen this type of ravioli in a food store, so I figured I am going to have to learn to make my own pasta. Like most people who have never made their own pasta I was intimidated by the idea and thought it would be too much trouble. In fact I thought about making my own pasta for probably 15 years before I actually tried it in January of this year. Let me help you out a little ... don't wait! It is way too much fun to miss out on it any longer.
  I do have a few pointers for you if you don't have any pasta making devices currently and are thinking of trying homemade pasta. If you have a KitchenAid stand mixer that accepts the pasta attachments, definitely go that route. The sheet, spaghetti and linguine attachments are a must. I also opted for the ravioli maker, but if I had to do it all over again I would forgo the $150 expense. I think the process I use in this entry is plenty good enough. I also recommend getting 'The Pasta Bible'. I haven't gotten my copy yet, but it has recently shot to the top of my book buying list. For anyone who intends to make homemade pasta part of their life, it will be an invaluable asset.
  This is somewhat of an original recipe. I could not find an exact recipe on the internet so I researched the components and put together what seemed right to me. The ravioli filling is a cheese filling adapted for this recipe, the sauce was a mixture of several different Alfredo sauce recipe's with the yummiest components being reserved for my own version and of course the pasta recipe is a standard recipe from the book that came with my pasta attachments. This recipe serves 4.

Ravioli Filling
1 bunch asparagus (about 2-3 inch diam)
1/2 tsp garlic powder
1 c ricotta cheese
1/4 c grated Parmesan cheese
2 large egg yolks
1 tsp salt
1 tsp pepper
1 pinch nutmeg

  1. Snap the asparagus toward the bottom of the stalk and discard the bottom. It is fairly common to throw away as much as 2 to 3 inches of the bottom depending on the how fat and how long the stalk is. We are trying to retain the most tender, non-woody parts of the asparagus. Remove 8-12 of the tips about 2 inches long and set aside for the sauce.

  2. Steam the remaining asparagus (not the tips) for 2-4 minutes or until al dente. Immediately put in an ice bath to stop any further cooking. Once cooled, remove the asparagus from the bath and remove as much water as you can in a towel or by other suitable means. This last part is important so your filling isn't runny.

  3. Chop the asparagus in a food processor. I chop mine so that the pieces are about the size of a peppercorn.

  4. Combine the asparagus and the remaining ingredients (not the tips) in a bowl. Mix well. Cover and store in the fridge until needed.

Pasta Sheets
4 c all purpose flour
4 eggs
1 tbsp water
1 pinch of salt

  1. I should point out the pasta recipe calls for 3.5 cups of flour, but when you use the well method for pasta dough it doesn't hurt to have extra on the board. If you are making the dough in a machine only use 3.5 cups of flour. I should also point out that I now prefer the well method, but it took a little practice to keep the egg from spilling out.

  2. The process is pretty simple. Put the flour on a counter top or large wooden surface and make a hole in the center where the eggs, water and salt will be whipped together like making scrambled eggs. Slowly start mixing in flour from the inside of the well until resulting mass can be worked by hand. Remove any unneeded flour and knead the dough until the right consistency. This last statement is hard to describe. If you do it enough you just know when it is ready. 'The Pasta Bible' can help with this a little.

  3. When the dough ball is ready, cut in two. Wrap each piece in plastic wrap and sit in the fridge for 30 minutes.

  4. Using a pasta sheet maker, roll the pasta sheets out according to the instructions for your device.

Assemble Ravioli

  • When making my pasta sheets I keep them to a manageable size, about 24 inches long. When I am ready to make the ravioli, I fold one of these sheets in half and cut the folded end off so I have 2 separate sheets that are the same size. One is for the top and one is for the bottom.

  • For a full sheet I aim for 2 ravioli in width and however many I can fit lengthwise. The sheet above is a 2x5 example. Scoop the filling on to the bottom sheet in the center of each ravioli. Egg wash (beaten egg with a little water) the edges and in between each scoop of filling. Lay the top sheet on and remove as much air as possible working from the center out before cutting and crimping. Be careful not to squeeze the filling out from the center.

  • I am using a cutting/crimping wheel to finish the ravioli here. Roll the cutter along the edges and in between each ravioli.

  • These can be cooked right away in unsalted boiling water for 4 minutes or frozen for several months. Even the frozen version will cook in 5 minutes right from the freezer.

Alfredo Sauce and Finishing the Dish
2 c light cream
1-2 cloves garlic, minced (I prefer using a garlic press)
8-12 asparagus tips (reserved from above)
2 tsp salt
1 tsp pepper
2 tbsp flour
1/4 c grated parmesan cheese (don't chince on this, get the real stuff!)
1 tbsp butter

Note: Because the sauce comes together so quickly you will want to put a pot of water on to cook the ravioli when you start the sauce.

  1. On medium low heat, melt the butter and add the garlic to the melted butter. Do not brown the butter or the garlic. If this happens the heat is to high. This step should only take a minute or two. If your kitchen smells of garlic then you are doing it right. :-)

  2. As soon as your water is boiling add your ravioli and stir often to ensure even cooking.

  3. Add the cream, salt, pepper and asparagus tips. Stir often.

  4. Mix a little water with the flour until smooth. Remove any lumps. This will be used to help thicken the sauce a bit.

  5. When the cream mixture starts to bubble, briskly stir in the flour/water mixture and grated cheese.

  6. You can turn the heat off once the mixture is smooth.

  7. The ravioli should be done and bobbing on top of the cooking water. With a slotted spoon, scoop out the ravioli and mix in with the sauce. Make sure most of the water is drained from the ravioli. Cover and let stand for a minute or two.

  8. Serve it immediately.
The journey I experienced on this dish was very satisfying. I hope anyone who tried this enjoys it as much as we do and I would certainly love to hear back from anyone who does. As always, this recipe is a guide, if something doesn't suite you or something is missing please adapt the recipe and let us know how it worked out for you. Someone else may get some use from your suggestion as well.


TTFN

B.