Monday, May 30, 2011

Greek Yogurt With Macerated Blueberries and Strawberries


  This simple and appropriately colored dish is a refreshing and somewhat healthy snack or dessert. By the way, happy Memorial Day to everyone and a great big Thank You to our veterans and soldiers both living and deceased!

Greek Yogurt With Macerated Blueberries and Strawberries
1/2 c Greek yogurt
3 tbsp sugar
1/4 c strawberries, sliced
1/4 c blueberries

  Macerate the berries by adding 2 of the tbsp of sugar to the berries, mix well and let sit for 20 minutes. Mix the remaining tbsp of sugar into the yogurt. Once the berries are nice and juicy, put half the berry mixture in the bottom of your bowl, cover with yogurt and put the remaining berry mixture on top. Enjoy! :-)

  A quick word about Greek yogurt. Unless you get the yogurt from Greece, it won't really be much different than regular yogurt except the majority of the whey will have been removed to get the thicker consistency associated with Greek style yogurt. With that said, if you take regular yogurt and drain the whey out by using a coffee filter and a colander, you will get a very similar result. Simply put a coffee filter in a colander and put the yogurt in the coffee filter. Put a bowl under the whole contraption to catch the whey. You can use the whey for other recipes if you like. The process takes a few hours and I typically do it overnight in the fridge. I have been using this technique for years for baked potato topping, sauces, dips and dressings. It really is a great substitute for sour cream.

TTFN
B

Sunday, May 29, 2011

Bread and Butter Cauliflower

 
  Somehow this recipe never made the blog last fall, but now that we are on the last jar and wish we had more it certainly deserves mentioning. We acquired a lot of cauliflower in the fall with every intention of canning all kinds of items, but we just got plain canned-out and this was the only canning item we made with cauliflower. We used Aunt Lib's bread and butter pickle recipe and it is definitely on the canning list again this year.

Bread and Butter Cauliflower (about 4 quarts)
4 qts cauliflower, cut into florets (about 2-3 med heads)
2 medium onions, sliced thin
3 c white vinegar
4-5 c sugar
1 1/4 tsp turmeric
1 tsp celery seed
2 tsp whole mustard seed

1/2 c canning salt for cauliflower/onion prep
ice for cauliflower/onion prep

  Blanch cauliflower for 5 minutes. Put the cauliflower and onion slices in a large bowl, cover with canning salt and ice. Let sit at least an hour. Rinse the cauliflower and onions well to get all the salt off. Combine vinegar, sugar, turmeric, celery seed and mustard seed into a pot. Bring to a boil. Pack warm jars with the cauliflower and onions. Split the liquid between jars. The liquid should completely cover the cauliflower. Leave 1/4 inch of head space. Adjust two-piece caps. Process 15 minutes in a boiling-water canner or 5-10 minutes in a pressure canner at 10 psi. Enjoy!

TTFN
B

Peanut Butter Cup Smores


  No real recipe here, just an epiphany. We were making smores the other night and I thought peanut butter cups instead of plain chocolate would be good. Was it ever. I won't insult anyone with the ingredients list or instruction, but do try swapping the chocolate for a few creamy peanut butter cups like you can find at Walmart or your local grocery. I'm sure Reese's would do fine, but the creamy variety have a different texture and mouth feel. Enjoy! :-)

TTFN
B

Tuesday, May 24, 2011

2011 Bucket Garden Update 2


  Everything is flowering and all things green are flourishing. What a beautiful time of the year.

Even our roses are blossoming.

The garden plants are no exception. We have had a few losses over the last few weeks, but overall I am pleased. The Chinese Five Color Pepper plants have sprouted up all over the original container they came in and I expect we will give a few of these away this year as gifts. These ornamental pepper plants are very colorful. It is very satisfying to watch all of these plants grow from seed and I can't wait to make some of my favorite summer dishes from our garden harvests.

TTFN
B

Mild Italian Link Sausage

 
  Who doesn't like sausage? The only thing I dislike about store bought sausage is most of it contains MSG (or natural salt if you want to be evasive). An allergy to MSG prevents some of our family from partaking in MSG laden foods, so we have to take matters in to our own hands when it comes to things like sausage. Preparing this sausage is a little extra work, but very satisfying in the end. I recommend doing as much sausage making as you can while all the sausage making gear is out. It isn't hard and maybe this entry will push you over the edge to try it yourself.

Mild Italian Link Sausage
2 lbs pork butt (with fat)
2 tsp kosher salt (or sea salt)
1 1/2 tsp black pepper, ground
1/2 tsp garlic powder
1 tbsp dried parsley
1 1/2 tsp fennel seed, ground
5 ft natural casing

For Hot Sausage Add:
2 1/2 tsp paprika, ground
1/4 tsp anise seed, ground
2 tsp red pepper flakes

  Mix all seasoning ingredients together. Cut the pork into chunks. Mix the pork and seasonings together. Grind the pork mixture with your choice of meat grinding hardware.

  Our choice of sausage stuffing and grinding hardware was the sausage attachments for our KitchenAid mixer. We used the fine die on the mixer for grinding, but recommend using the course or large die. The next time we do this we will definitely use the larger die for grinding. Once the pork is ground, refrigerate the mixture for at least an hour while preparing the casings. The mixture should be cold while stuffing the sausage.

  We used natural casings obtained from a local kitchen store. The package is fairly small and could easily be ordered from the internet if you cannot find it locally. You may want to consider using collagen casings instead of the natural casings if that is more to your liking. There is a lot of information on the internet about the different kinds of sausage casings and plenty of places to order them from. Any leftover casings can easily be stored either in your pantry or refrigerator depending on the type you choose. To prepare our casings we had to soak them in warm water and rinse them thoroughly.

  When the ground pork mixture was chilled for an hour, I tied one end of a prepared casing into a knot and slid the other end on to the sausage making tip all the way up to the knotted end. I turned on the mixer and started stuffing the ground pork mixture into the hopper which feeds an auger which eventually pushes the pork in to the casing. Continue until the casing is completely full or you run out of meat.

This particular batch was grilled with sweet onions and peppers and served on a soft italian roll.
A few things we learned along the way:
- Any left over natural casings can be stored in your refrigerator, sealed in the original bag completely covered in salt for up to a year.
- To clean out the auger after making the sausage, send a few pieces of bread through the system to push out any left over meat. This greatly simplified the cleanup.

Enjoy!

TTFN
B

Sunday, May 8, 2011

Grilled Breakfast Pizza


  This is fun to do and super yummy. It is common for us to go through the fridge on a Saturday or Sunday morning and use whatever is in there to make omelettes and the like. Seems fairly natural (to me) to do a pizza like this too. :-) This version really was conceived about an hour before we made it based on what we had lying around. Like omelettes, there are no hard and fast rules.

Grilled Breakfast Pizza
21 oz pizza dough ball (store bought or homemade)
3-4 oz thick sausage gravy, prepared
4 oz shredded cheddar 
4 small leftover potatoes, roughly cubed
1 medium onion, roughly sliced
2 Tbsp olive oil
6 eggs
1/2 lb browned sausage (recipe)
12 stalks barely cooked asparagus

  Saute onions in olive oil until caramelized. Add potatoes and cook for another 5 minutes. Set aside. Preheat grill and pizza stone for 10 minutes with burners set at about medium. A more in depth discussion on cooking pizza on a grill can be found here. I built the pizza on a 16" pizza screen. The dough is stretched in to a 16" circle and layed on the screen. Cover with sausage gravy. Spread onion and potato mixture evenly. Spread cheese evenly. Spread sausage evenly. Use you fingers to make 6, evenly distributed, egg wells in the toppings. Don't press too hard or the screen will cut through the dough, just sorta move the toppings aside. Place an asparagus stalk on either side of each egg well, tips pointing in.

  Set a timer for 2 minutes and place the screen (and pizza) on the pre-heated pizza stone and close the grill lid. After two minutes, remove the screen (with pizza), and crack the 6 eggs into the prepared wells as quickly as you can and return to the grill. I turn on my sear burner at this point too. Set your timer for another 2 minutes. About every 20 seconds rotate the pizza 1/6 rotation so the sear burner doesn't burn your crust. Remove the pizza when the crust has a good char and the eggs are just barely cooked, about 4 minutes total. Cut the pizza into 6 pieces so that each piece has 1 egg and two asparagus stalks. Enjoy.

TTFN
B

Grilled Margherita Pizza


You haven't tasted pizza until you've tasted a real Margherita pizza. Wow ....

".... the classic story of the pizza Margherita. Modern pizza history was made in 1889 when Queen Margherita Teresa Giovanni, the consort of Umberto I, visited Naples with her king. Don Raffaele Esposito, who owned Pietro Il Pizzaiolo, was asked to prepare a special dish in honour of the Queen's visit. Esposito consulted his wife who was the real pizza expert and together they developed a pizza featuring tomatoes, mozzarella cheese, and basil. He named it the Margherita Pizza, after the city's guest of honor. " (recipepizza.com)

  Today, the cassic Margherita pizza is a simple pizza dough covered with crushed tomatoes, a sprinkle of sea salt, pinched pieces of fresh mozzarella cheese, fresh basil leaves, a sprinkle of grated parmesan cheese and a drizzle of olive oil. Traditionally the pizza is then baked in a wood fired oven at around 700 degrees F for about 90 seconds. Most of us can't touch those temperatures unless we have our own wood fired ovens, but I can get close enough with my outdoor grill to enjoy this classic pizza.
 
Grilled Margherita Pizza
21 oz pizza dough ball (store bought or homemade)
3-4 oz crushed tomatoes
8 oz fresh mozzerella
6-10 fresh basil leaves
generous pinch of sea salt
small handful grated parmesan cheese

  I heat my grill up with the 16 inch stone in the center (lid closed). I set the burner dials at about half. After 10 minutes the thermometer in the lid of my grill measures about 400 degrees F. I don't have an infrared thermometer, but I am pretty sure the stone is at least 600 degrees F.

 Recently I have discovered the pizza screen. While the grill is heating up, I build the pizza right on the screen. (I discuss the technique for stretching the dough here.)

  The screen goes right on the stone for 2 minutes. After 2 minutes, I slide the peel in between the screen and the pizza so I can remove the screen and put the pizza directly on the stone. I also turn on the sear burner at the back of my grill and rotate the pizza over the next 2 minutes making sure all the edges have been cooked properly. With a little practice I have been able to get a good char on the bottom of the finished pizza.

  The whole cooking process takes about 4 minutes. You may want to use a timer because it doesn't take long to turn the pizza into a cinder at these temperatures. If you like NY style pizza, I guarantee you will love this pizza.

TTFN
B

Pizzeria Pizza Dough


  Many years ago I made my own pizza dough at home. I was trying to re-create the dough we used at the pizza shop I worked at as a student, but I never really found what I was looking for and consequently when I discovered I could buy pizza dough balls at the grocery store I had to try them. It turns out they were pretty good and a whole lot less trouble too. But, I can't really take the complete home pizza journey unless I make my own dough. So, after all these years I finally found what I was looking for and I got a little help from an unexpected source. I knew what ingredients I wanted to use and I knew some of the relative amounts, but we used to make 45 doughs at a time at the pizza shop and scaling that down to 1 pizza dough was the real challenge I was facing. Thats where the unexpected help comes in: introducing ..... the Lehmann Pizza Dough Calculator (insert angelic voices here). This tool allowed me to quantify and tweak those ingredients and ratios until I finally found the dough of my dreams. :-)

  Now, having said all that, I am fairly old school when it comes to cooking and baking. I learned to cook using volumetric ratios (ya know, measuring cups and the like), but when it comes to dough, I think a scale is the only way to go (at least for the flour and water). If you want that extra measure of success, you really need to use a scale when it comes to bread and pizza dough.

Pizzeria Pizza Dough
12.82 oz ap flour (100%) (approximately 2 3/4 c)
7.82 oz water (61%)
.03 oz/ 1/4 tsp instant dry yeast (.21%)
.17 oz/ 1 tsp sea salt (1.32%)
.28 oz/ 2 tsp sugar (2.19%)

  I throw all these ingredients into my Kitchenaid mixer and combine with a dough hook for about 5 minutes. I then dump it on to my floured counter top and let it rest for 5 minutes. You should end up with a dough ball around 1.3 lbs that is soft and slightly tacky. This is adequate for a 16 or 18 inch pizza. For a 14 inch pizza you may want to try 1 lb dough balls. You could triple this recipe and cut the resulting mass into 4 pieces or you could use the Lehmann Pizza Dough Calculator (LPDC) to back calculate a 1 lb dough ball from the ratios listed above. Below is a shot of the LPDC in action:


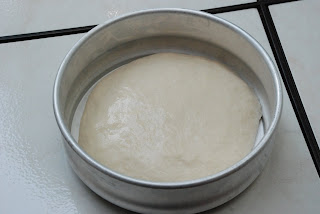
  Ok, so you have a hunk of dough ... now what. This next piece is fairly important if you want to make a round pizza without any holes in it when you stretch it. Hold the dough with both hands and curl your fingers in toward the center of the dough ball while stretching the other side of the dough ball with your palms. Turn the dough a quarter turn and do the same curling motion again. Do this 3 or 4 times. If done correctly you should have a dough ball that is nice and smooth and tight on one side and messy and ragged with a hole in the middle on the other side. Pinch and twist all the ragged parts together in the center closing the hole. This ragged side will be the bottom of your dough ball. Place the dough ball (bottom side down) in a lightly oiled bowl and cover with saran wrap for a few hours to proof at room temperature. You can tell when the dough is done proofing because the dough will have relaxed significantly and it will have a bit of a sheen to it (see pics below). If you want to freeze the dough, stick it in a lightly oiled quart freezer bag to proof for a few hours and then stick it in the freezer in such a way as to preserve the shape of the ball until it is frozen.

Before proofing. Dough is semi-tight with no sheen.
After proofing. Dough has relaxed and has a bit of a sheen to it.

  I am not a big fan of the 'faster is better' philosophy, but sometimes you need to get things done a little quicker than normal. I have proofed this dough in as little as 45 minutes and had good results. For the fast proof method, use warm water when you make the dough and proof the dough in your oven that has been pre-heated to 100 degrees F (turn the oven off after pre-heating). Place the saran covered bowl (and dough) in the oven for 45-60 minutes.

  If you need a little help on stretching the dough to make a round pizza, I discuss this technique here.
 Enjoy!

TTFN
B

Classic NY Style Pizzeria Pizza Sauce


  If you ask ten people what the best pizza sauce recipe is you'll get ten different answers. With that said, I couldn't really tell you what even I think the best pizza sauce is because there are so many variables and kinds of pizza to consider. Pizza can be as complicated or as simple as an individual wants to make it. We like simple and the following recipe definitely fits the bill. This recipe is based on the sauce we used at the pizzeria I worked at in State College PA when I was a student. This particular pizzeria was very popular at the time and people lined up down the street and around the corner in snow and rain on Friday and Saturday nights to get $1 slices and 25 cent refills. I think this sauce is fairly representative of all the NY Style pizzeria's I have frequented over the years and I like it enough to use it in my own home.

  The sauce is very thin by design and only enough to just cover the surface of the dough is needed. It shouldn't be running off the sides or pooling in the middle of the pie. In a properly heated pizza oven (575 to 800 degrees F), the sauce looses much of the excess moisture and the flavor concentrates somewhat. My home oven only heats to 550 degrees F and this sauce even works well at that temperature. Enjoy!

Classic NY Style Pizzeria Pizza Sauce
6 oz can tomato paste
2 1/2 cans of water
1 tsp dried oregano
1 tsp dried parsley
1 tbsp salt
1 tsp pepper
1 tsp garlic powder
1 tsp sugar

  Combine everything in a bowl and mix well. You can use it right away, but it has better flavor and body if you make it at least a day before you need it. It will keep at least a week in the fridge. This is also another great excuse to use fresh parsley and oregano from the garden. ;-)

TTFN
B

2011 Bucket Garden Update 1


  Well, seeds are planted, soil has been prepared and the buckets are being cleaned up for another round of container gardening. Actually, this photo is about a week old and the majority of the plants in the foreground have already been moved to larger pots and are coming along nicely.
  One of the biggest surprises so far are the seeds I saved from the sweet peppers we get from Costco. They have all germinated and so far are the only peppers out of about 10 varieties I started from seed that have done so. I didn't know much about these peppers (other than we really like them) when I saved the seeds. I didn't even know if they were hybrid or heirloom or even if they would grow from seed at all. They are so tasty that I figured they must be some kind of hybrid and I didn't really expect much from them. I have since discovered they are called 'Sweet Pickle Peppers' and they are an heirloom variety which means we will be saving seeds from these plants again for next year. They have germinated so quickly and they taste so good I wonder if they are disease prone or insect magnets. I guess we'll find out. :-)
  All of the basil has popped up as well and with all the pizza action going on around here lately, it is a good thing. Most of the tomatoes have done very well and we certainly look forward to eating some of the new varieties we have come accross this spring. I have several colorful dishes in mind for all the varieties of tomatoes and peppers we are growing this year. I can't wait ... :-)

TTFN
B